Offensive eBPF - Part 1: Classic BPF
by h3xduck
25 July 2025Three years ago, on 2022, I had to write my bachelor thesis for my CS degree. Back then, I had already played around with the idea of rootkits, which eventually led me to releasing Umbra, my first open source piece of malware (just for fun ;)). When my then supervisor Juan Tapiador told me about this new thing called eBPF, it was clear to me that it was the time to do another rootkit. And so, TripleCross was born, an open source eBPF-based rootkit.
I am incredibly happy of having done this project. In retrospective, it took many sleepless nights fighting with the eBPF verifier (oh we will ramble about this), but it was really fun and it led to fantastic things later on, specially my talk at RootedCON, the largest cybersecurity conference in Spain, where I first discovered how much do I love going to conferences and giving talks (even though outside of that I’m a little awkward and shy!). I will always be greateful to Alfonso Muñoz for the invitation.
One day, my friend Ismael (btw, he later created a super cool rootkit on eBPF himself!!) asked me why didn’t I write the thesis as a blog post, with my comments, and without all the formalities and unnecessary glitter that a thesis requires. It’s been a year from that, but today I found the energy to start doing so. And after that, I may write about my newer research projects, with which I have since sifted from malware to the exploitation world (but malware is still my true passion).
And before we start, you have to know I was not remotely the first person to explore how eBPF can be used offensively. My work was based on the work of giants like Jeff Dileo in DEFCON and Guillaume Fournier and Sylvain Afchain at BlackHat. The true contribution of my work is not the discovery that eBPF could be used for bad things, but rather that I put together for the first time all the documentation and interesting offensive capabilities of eBPF, and then spinned it up to create my own open source work with some slightly new things.
Let’s start - What is eBPF? Classic BPF
Yes yes, I know, I said I wrote a rootkit with eBPF, but I didn’t even say what it is. Nowadays eBPF is not officially considered to be an acronym anymore, but it remains largely known as “extended Berkeley Packet Filters”, given its roots in the Berkeley Packet Filter (BPF) technology, now known as classic BPF. Let’s start from here, and we will find our way to how eBPF is nowadays.
BPF was introduced in 1992 by Steven McCanne and Van Jacobson in the paper “The BSD Packet Filter: A New Architecture for User-level Packet Capture”, as a new filtering technology for network packets in the BSD platform. It was first integrated in the Linux kernel on version 2.1.75.
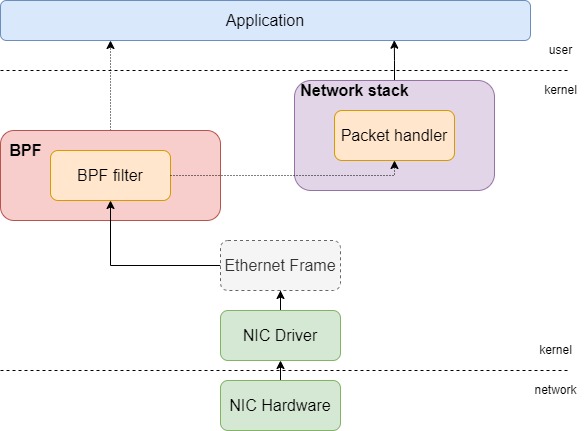
At the time, BPF was much more basic. After receiving a packet via the Network Interface Controller (NIC) driver, it would first be analysed by BPF filters, which are programs directly developed by the user. This filter decides whether the packet is to be accepted by analysing the packet properties, such as its length or the type and values of its headers. If a packet is accepted, the filter proceeds to decide how many bytes of the original buffer are passed to the application at the user space. Otherwise, the packet is redirected to the original network stack, where it is managed as usual.
One clarification: classic BPF is still in use, as we will see. It’s just that eBPF has gone much further than that.
The (classic) BPF virtual machine
BPF comprises both the BPF filter programs developed by the user and the BPF module included in the kernel which allows for loading and running the BPF filters. This BPF module in the kernel works as a virtual machine, meaning that it parses and interprets the filter program by providing simulated components needed for its execution, turning into a software-based CPU. Because of this reason, it is usually referred as the BPF Virtual Machine (BPF VM). The BPF VM comprises the following components:
- An accumulator register, used to store intermediate values of operations.
- An index register, used to modify operand addresses, it is usually incorporated to optimize vector operations.
- A scratch memory store, a temporary storage.
- A program counter, used to point to the next machine instruction to execute in a filter program.
Inside this BPF VM is where we execute the classic BPF filter programs. You can think of a BPF filter as a boolean function:
- If it returns true, the kernel copies the packet to the application.
- If it returns false, the packet is not accepted by the filter (and thus the network stack will be the next to operate it).

See above an example of a BPF filter. Green lines indicate that the condition is true and red lines that it is evaluated as false. Here the execution works as a control flow graph (CFG) which ends on a boolean value. In our example, the BPF program which accepts the following frames:
- Frames with an IP packet as a payload directed from IP address X.
- Frames with an IP packet as a payload directed towards IP address Y.
- Frames belonging to the ARP protocol and from IP address Y.
- Frames not from the ARP protocol directed from IP address Y to IP address X.
Classic BPF bytecode instruction format
In order to implement the CFG to be run at the BPF VM, BPF filter programs are made up of BPF bytecode, which is defined by a new BPF instruction set. Therefore, a BPF filter program is an array of BPF bytecode instructions.
| OPCODE | JT | JF | K | |
|---|---|---|---|---|
| NUMBER OF BITS | 16 | 8 | 8 | 32 |
The table shows the format of a BPF bytecode instruction. As it can be observed, it is a fixed-length 64-bit instruction composed of:
- An opcode, similar to assembly opcode, it indicates the operation to be executed.
- Field jt indicates the offset to the next instruction to jump in case a condition is evaluated as true.
- Field jf indicates the offset to the next instruction to jump in case a condition is evaluated as false.
- Field k is miscellaneous and its contents vary depending on the instruction opcode.
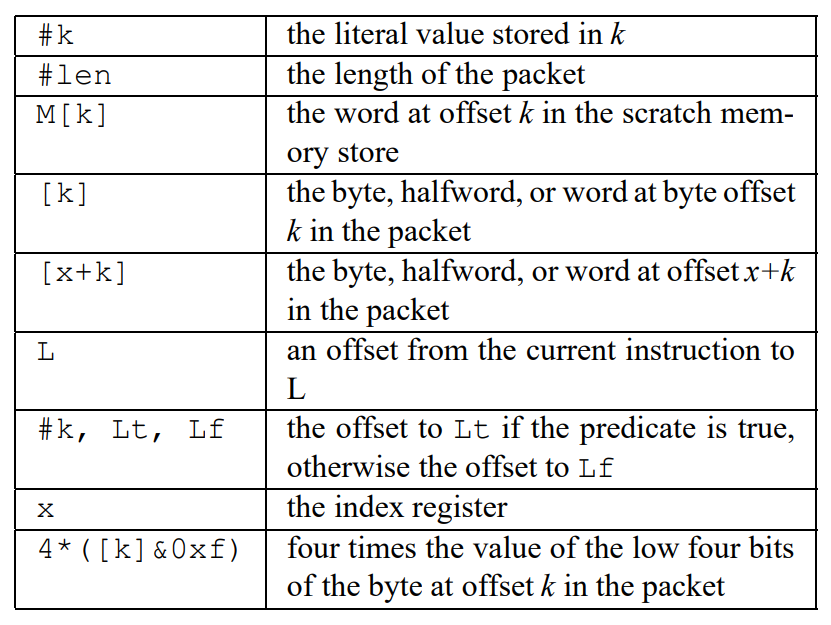
And each BPF instruction is defined according to the BPF instruction set, as shown in here:
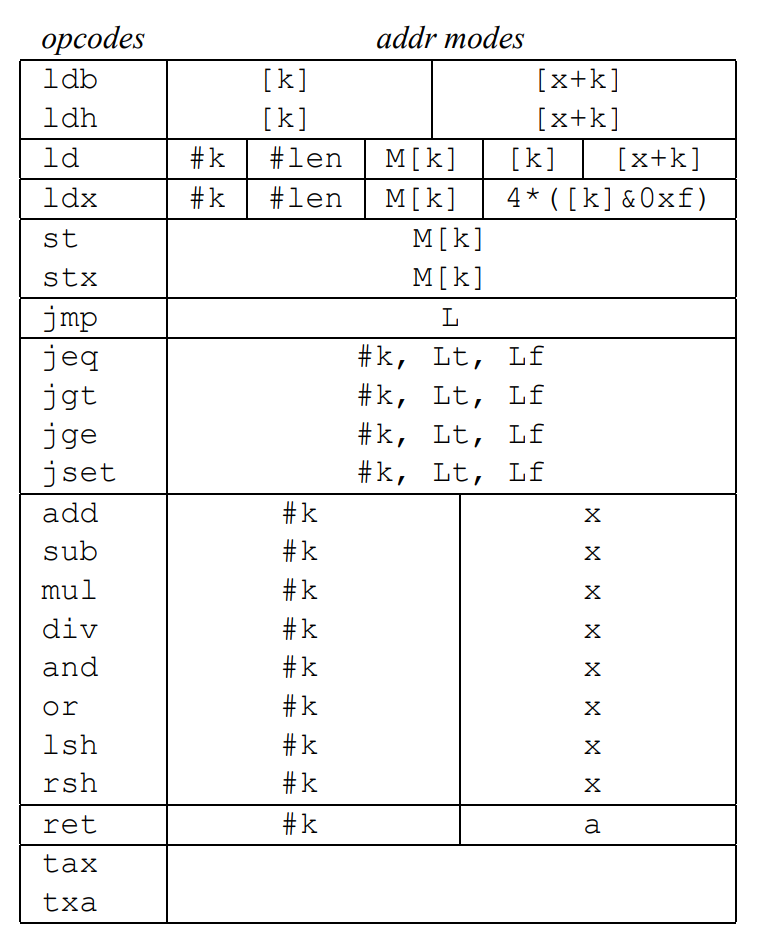
We have every type of instruction we can expect:
- Load instructions, copying the addressed value into the index or accumulator register.
- Store instructions, copying the accumulator or index register into the scratch memory store.
- Jump instructions, changing the program counter register. These are usually present on each node of the CFG and evaluate whether the condition to be evaluated is true or not.
- Arithmetic and miscellaneous instructions, performing operations usually needed during the program execution.
- Return instructions, positioned in the final end of the CFG, and indicate whether the filter accepts the packet (returning true) or otherwise rejects it (return false).
Tcpdump uses classic eBPF
At the time, by filtering packets before they are handled by the kernel instead of using a user-level application, BPF offered a performance improvement between 10 and 150 times the state-of-the-art tools of the moment. Since then, multiple popular tools began to use BPF, such as the network tracing tool tcpdump, and still does so until our days.
tcpdump is a command-line tool that enables to capture and analyse the network traffic going through the system. It works by setting filters on a network interface, so that it shows the packets that are accepted by the filter.
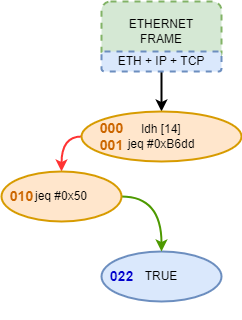
Here is an example of BPF code used by tcpdump to implement a simple filter.
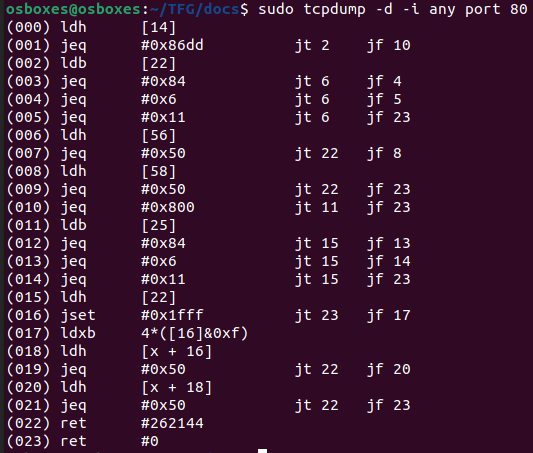
We can see how tcpdump sets a filter to display traffic directed to all interfaces (-i any) directed to port 80. Flag -d instructs tcpdump to display BPF bytecode. Using the jf and jt fields, we can label the nodes of the CFG described by the BPF filter. The following image describes the shortest graph path that a true comparison will need to follow to be accepted by the filter. Note how instruction 010 is checking the value 80, the one our filter is looking for in the port:
Wrapping up
That’s all to know about classic BPF! Next, we will start going deep into modern eBPF. See you on the next entry of the eBPF series:
Part 3 (Yet to come!)
tags:
This work is licensed under a Creative Commons Attribution 4.0 International License.